3D Yardage Book Instructions

Hole yardage from respective tee box
--------------------->
Stacked colors and numbers
represent yardage to that spot from that tee box
---------------------------------->
Single numbers in fairway
represent yardage from that
spot to the center of the green.
------------------------>
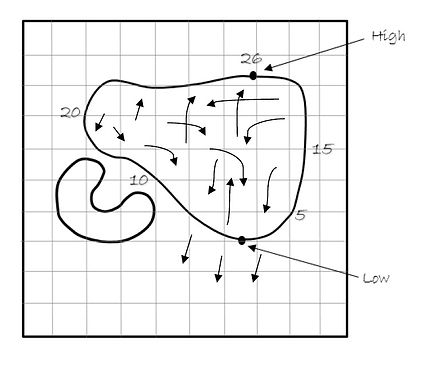
Each box in the green grid represents 5 yards
-------------->
Total green depth
---------------------------------->
My Caddie Pro
When a player is ready to map out his/her yardage book, knowing the yardage you’re playing from is essential. This information can often come from the tournament details and viewing the course scorecard that can often be found on the course website.
When a player begins to map out their yardage book, there are several applications and/or sites they can choose from to gather accurate information. For these instructions we used Google Earth. However, phone GPS apps are highly recommended.
Step by step, here’s how we created our yardage book.

Charting Fairways
Begin by finding the yardage or tee marker you will be playing with in your tournament. Begin with the yardage of the first hole.


After finding our 1st hole yardage was 377 yards on the scorecard, we used the ruler option to draw a line starting from the center of the green back to our tee box and marked the spot.
From the spot you marked on the tee box, measure out the yardage to all the hazards and yardage to clear the hazards. Finally draw a line from the tee box to your expected landing area.


From the center of the green, draw back two or three lines in or around the fairway from trees, shrubs, doglegs or adjacent from a hazard, and mark your yardage. This will help with yardage familiarity around landing areas and your approach shot to the green.

Charting Greens
Begin by measuring the green from side to side and top to bottom from its furthest points.


From the center of the green, draw back two or three lines in or around the fairway from trees, shrubs, doglegs or adjacent from a hazard, and mark your yardage. This will help with yardage familiarity around landing areas and your approach shot to the green. Charting Greens Begin by measuring the green from side to side and top to bottom from its furthest points. Draw the green on the grid using the boxes in 5-yard increments. If enough space is available, draw any greenside bunkers. Mark the highest point and the lowest point of the green. These two areas will play important roles when figuring out your fall line and green breaks. Be careful, sometimes the furthest point isn’t the lowest point. When drawing your sketch have the bottom of the green touching a grid line. This will make it easier to accurately chart your yardages.

Label your lines for accurate approach shot yardages. You can then utilize these yardages in relation to the tournament pin sheet, zone or flag color.
Prior to making the decision on an approach shot, the player must take into account a number of factors such as lie, distance, wind and green acceptability just to name a few. Ideally, the player may have also had the opportunity to play a practice round whereas he/she were able to draw slopes and breaks in their yardage book.
Players can utilize any slope information in and around the green to be aggressive or protective with their approach shot when aiming for the pin.